These instructions are based on using the W52P software version "425.30.0.20" in its factory default configuration which is to obtain a dynamic IP address automatically from your router using DHCP, which is how most people have their home routers configured. This guide also assumes that you've already associated your W52P's handset to the phone's base station. For information on configuring your W52P with a static IP address, as well as information regarding handset registration, please refer to the W52P user manual.
We recommend that you read each step through in its entirety before performing the action indicated in the step.
Step 1: Initial Setup for your Yealink phone
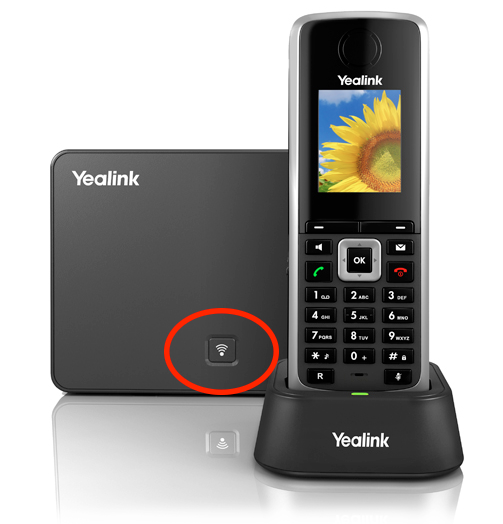
Connect your router with the supplied Ethernet network cable to the ethernet port found on the Yealink's base station. Then plug the supplied power cable into the base station.
Wait 60 seconds after plugging the base station's power adapter.
After 60 seconds press the Paging button located on the face of the base station, as indicated by the screen shot below:
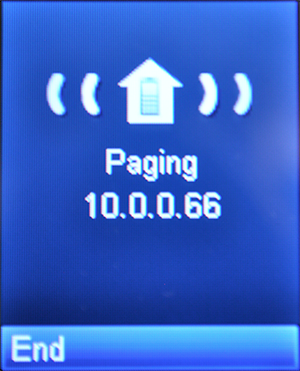
Once pressed, the IP address of the base station should be displayed on the handset, as indicated below:
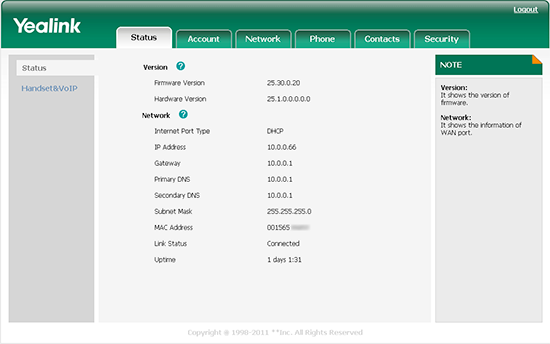
We will now login to your device's web configuration interface. Enter the displayed IP address into your favorite browser. You should now see a page that looks like this:

Enter the system username/ password on the given field. The default system credentials should be admin for both the username and the password.
After entering the system credentials and clicking the Confirm button, you should see a screen that looks similar to the one below:
We're now ready to configure your Go Connect account information.
Step 2: Configuring your Go Connect account
To configure your Go Connect account settings, copy and paste your username and password that was sent to you by email.
Once you have selected your desired line, please use the following settings:
| Setting | Value |
| Account Active: | Enabled |
| Label: | Go Connect |
| Register Name: | This is either the default extension XXX0XXX OR XXX0XXX, where XXX0XXX is the username assigned to you. |
| User Name: | This is either the default extension XXX0XXX OR XXX0XXX, where XXX0XXX is the username assigned to you. |
| Password: | Enter your extension SIP Password here. Your extension SIP password is the password that was emailed to you along with the username. |
| SIP Server: | pbx.goconnect.co.za |
| SIP Server Port: | 5060 |
| Enable Outbound Proxy Server: | Enabled |
| Outbound Proxy Server: | pbx.goconnect.co.za |
| Transport: | UDP |
| NAT Traversal: | Disabled |
Step 3: That's it! You can now make a phone call.
You can make a test call to *52, or if you are signed up for one of Go Connect's rate plans you can place a call to a traditional landline or mobile phone.
